
Overview
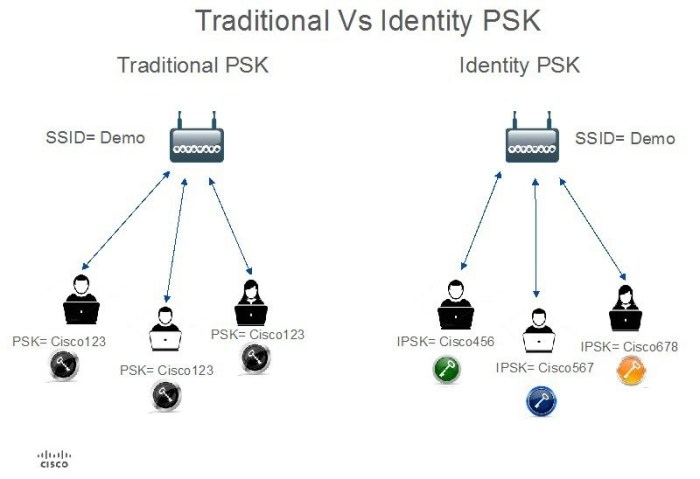
One of the features introduced with AireOS 8.5 for the Cisco Wireless LAN Controller (WLC) is Identity PSK (IPSK). IPSK allows each wireless client device to have its own, unique PSK, which increases the security of the network, as a compromised key cannot be used to connect another wireless client device to the network (providing that each device uses a unique PSK).
Cisco provides an Identity PSK Feature Deployment Guide; however, this guide only covers the RADIUS configuration for the Cisco Identity Services Engine (ISE). As discussed in the guide, other RADIUS servers are supported, including Cisco Secure ACS.
Configuration Steps in Cisco Secure ACS
Because some customers are still running Cisco Secure ACS, this guide focuses on the configuration of Cisco Secure ACS. The version used in this example is 5.8.0.32.9.
Step 1 (Optional)
The first step is to create an Identity Group to group all of the IPSK devices. This step is not necessary for enabling IPSK functionality, however it is recommended, as these groups can be used to create custom policies based upon the group membership of the device.
- Navigate to Users and Identity Stores > Identity Groups
- Click the Create button
- Enter a Name for the Identity Group
- (Optional) Enter a Description for the Identity Group
- Click the Select button and choose the Parent group
- Click the Submit button to create the Identity Group

Step 2
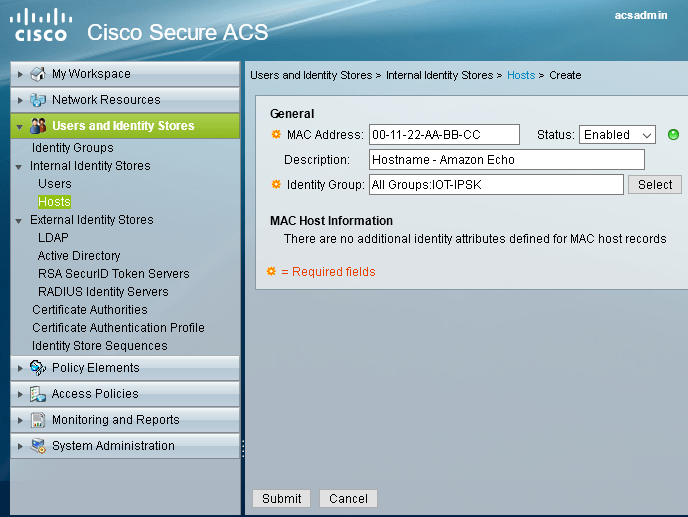
Next, enter the MAC addresses of the device that will be using an IPSK.
- Navigate to Users and Identity Stores > Internal Identity Stores > Hosts
- Click the Create button
- Enter the MAC Address using the format: AA-BB-CC-DD-EE-FF
- Leave the Status set to Enabled
- (Optional) Enter a Description of the device
- Select an Identity Group (such as one you created in the previous step), or leave this set to the default of All Groups
- Click the Submit button to create the Internal Host
Step 3
Next, create the Authorization Profile. Every unique IPSK will need to have its own Authorization Profile. So for example, if you have ten devices and you want them all to have their own, unique PSK, then you will need to create ten Authorization Profiles. Alternatively, if you want all ten devices to share the same IPSK, then you would only need to create one Authorization Profile.
- Navigate to Policy Elements > Authorization and Permissions > Network Access > Authorization Profiles
- Click the Create button
- On the General tab, enter a Name and optional Description
- On the RADIUS Attributes tab, enter the following for the PSK Mode:
- Dictionary Type: RADIUS-Cisco
- RADIUS Attribute: cisco-av-pair
- Attribute Type: String
- Attribute Value: Static
- Value: psk-mode=ascii
- Click the Add button to add this RADIUS attribute
- Staying on the RADIUS Attributes tab, enter the following to set the PSK:
- Dictionary Type: RADIUS-Cisco
- RADIUS-Attribute: cisco-av-pair
- Attribute Type: String
- Attribute Value: Static
- Value: psk=yourpsk
- Click the Add button to add this RADIUS attribute
- Click the Submit button to create the Authorization Profile
Note: The Authorization Profile created to provide an IPSK to the device can also be used to set the client device’s VLAN, ACL, QoS, and other values. The steps to configure these options are outside the scope of this document.

Step 4
Next, create the Access Service for IPSK.
- Navigate to Access Policies > Access Services
- Click the Create button
- Enter a Name for the Access Service
- (Optional) Enter a Description for the Access Service
- Select the Based on Service Template radio button and click the Select button
- Select Network Access – MAC Authentication Bypass
- Click OK
- Click the Next button
- Ensure that the Process Host Lookup checkbox is checked (enabled)
- Click Finish to create the Access Service
Step 5
Next, modify the Access Service’s Authorization Policy to allow for compound conditions:
- Navigate to Access Policies > (Access Service Name) > Authorization
- Click the Customize button
- In the Available Conditions box, select Compound Condition and click the > (right arrow) button to move it to the Selected box.
- Click OK
- Click the Save Changes button to save the configuration.

Step 6
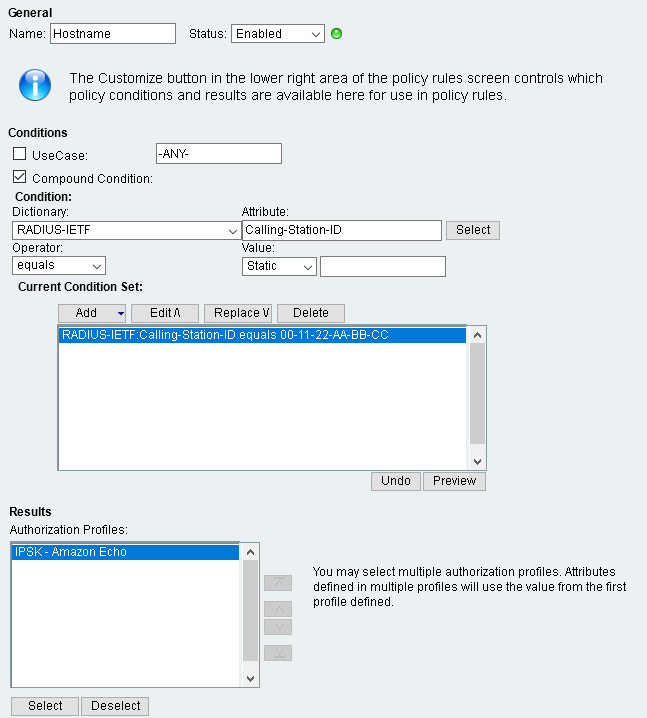
Next, modify the Access Service’s Authorization Policy:
- Navigate to Access Policies > (Access Service Name) > Authorization
- Click the Create button
- In the Name field, enter a name for the rule. I would recommend setting this to the host name of the device if using a unique PSK for each device.
- Leave the Status set to Enabled
- Check the Compound Condition box
- In the Dictionary drop-down box, select RADIUS-IETF
- In the Attribute field, click the Select button and select Calling-Station-ID
- In the Value box, enter the MAC Address of the client device.
- Click the Add button to add this condition.
- In the Authorization Profiles box, click the Select button and select the Authorization Profile that you configured back in Step 3.
- Click the OK button to create the Authorization Policy.
- Click the Save Changes button to save the policy.
Step 7
Next, create a rule that will use the Access Service that we have just created.
- Navigate to Access Policies > Access Services > Service Selection Rules
- Click the Create button.
- Enter a descriptive Name for the rule.
- Leave the Status set to Enabled.
- Check the Protocol box and select RADIUS
- Check the Compound Condition box.
- For the Dictionary drop-down box, select RADIUS-IETF
- For the Attribute field, click the Select button and choose Service-Type
- In the Value field, click the Select button and choose Call Check
- Click the Add button to add this condition.
- For the Results drop-down, select the Access Service created in Step 4.
- Click the OK button
- Click the Save Changes button to save the configuration.

Step 8
Finally, if you have other rules in ACS, you will likely need to move this rule up in the list. Otherwise, the client device may match on another rule and fail to authenticate.
- Navigate to Access Policies > Access Services > Service Selection Rules
- Select the rule created in the prior step.
- Click the ^ (up arrow) to move the rule up in the list. It should be a higher priority than RADIUS rules that use 802.1X authentication.
- Click the Save Changes button to save the configuration.
Conclusion
For additional information on the IPSK feature, including the steps to configure the Cisco Wireless LAN Controller (WLC), please consult the Identity PSK Feature Deployment Guide
If you are still running Cisco Secure ACS, I would highly recommend developing a strategy to migrate to the Cisco Identity Services Engine (ISE), as Cisco Secure ACS was announced End of Life (EoL) on 30 Nov 2016. The last date for Software Maintenance (EoSWM) is set for 30 Aug 2018 and the software will no longer be supported (LDoS) after 31 Aug 2020.
